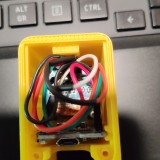
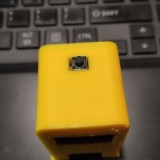
这次做的版本是上次这个时钟的简化版,由于不介入云平台,所以代码十分简单.这个的关闭屏幕方式我采用了使用轻触式开关的做法,按一下按钮即可关闭屏幕,再按一下则开启.如果通电开机前时按着开关不放,则进入重置状态.这次的校时同样是使用NTP校时,整个流程很简短,萌新都可以做,十分简单.
材料准备
| 材料名称 | 数量 |
|---|---|
| ESP8266 | 1个 |
| 0.96'OLED | 1个 |
| 常开开关 | 1个 |
| 3D打印外壳 | 1个 |
| 线 | 若干 |
外壳是可选的,点击这里下载模具文件 ,我这里是用了带四角轻触式开关开孔那个模具(见下图),OLED屏幕是使用SSD1306主控的.

硬件接线
| ESP8266 | OLED | 开关 |
|---|---|---|
| 3.3V | S1 | |
| 5V | ||
| GND | ||
| D1 | SCL | |
| D2 | SDA | |
| D3 | S2 |


接好线后的效果图(点击图片放大)
注: D3是同时作为屏幕开关和WIFI复位的用途.
软件准备
OLED用到的程序库:ThingPulse OLED SSD1306
需要注意的编译环境(亲测高版本会出错,未解决),全部库都可以在IDE内搜索下载.
-
ArduinoIDE编译通过的主要库版本:
ESP8266板库:2.4.2
Blynk版本:0.6.1
IDE版本:1.8.10
ArduinoJson:5.13.3 -
PlatformIO编译通过的主要库版本:
Blynk:0.6.1
ArduinoJson:5.13.4
ESP8266板库:2.0.4、2.1.1、2.2.0
代码
主代码
#include <Arduino.h>
#include <FS.h>

#include <ESP8266WiFi.h>
#include <ESP8266mDNS.h>
#include <ESP8266WebServer.h>

#include <WiFiUdp.h>
#include <ArduinoOTA.h>
#include <time.h>
#include <WiFiManager.h>
#include <DNSServer.h>
#include <ArduinoJson.h>

#include <Wire.h>
#include "SSD1306Wire.h"
#include "images.h"

SSD1306Wire  display(0x3c, D2, D1);
const int  SetPin = D3;

int SetPinState = LOW;
boolean toggle = LOW;
byte click = 0;        // 开关信号的改变次数,预设为 0

int timezone = 8 * 3600; //设置时区
int dst = 0;
bool shouldSaveConfig = false;

char blynk_token[34] = "";

void saveConfigCallback ()
{
  Serial.println("Should save config");
  shouldSaveConfig = true;
}

void setup()
{
  Serial.begin(115200);

  pinMode(SetPin, OUTPUT);
  int SetPinState = digitalRead(SetPin);
  configTime(timezone, dst, "time.windows.com");

  display.init();
  display.setI2cAutoInit(true);
  display.flipScreenVertically();
  display.setFont(ArialMT_Plain_10);
  display.setTextAlignment(TEXT_ALIGN_LEFT);
  display.clear();

  //读取FS json的配置
  Serial.println("mounting FS...");
  if (SPIFFS.begin()) {
    Serial.println("mounted file system");
    if (SPIFFS.exists("/config.json")) {
      //文件存在,读取和加载
      Serial.println("reading config file");
      File configFile = SPIFFS.open("/config.json", "r");
      if (configFile) {
        Serial.println("opened config file");
        size_t size = configFile.size();
        // 分配缓冲区以存储文件的内容。
        std::unique_ptr<char[]> buf(new char[size]);
        configFile.readBytes(buf.get(), size);
        DynamicJsonBuffer jsonBuffer;
        JsonObject& json = jsonBuffer.parseObject(buf.get());
        json.printTo(Serial);
        if (json.success()) {
          Serial.println("\nparsed json");
          strcpy(blynk_token, json["blynk_token"]);
        } else {
          Serial.println("failed to load json config");
        }
        configFile.close();
      }
    }
  } else {
    Serial.println("failed to mount FS");
  }
  //结束

  // 要配置的额外参数(可以是全局的,也可以只是在设置中)
  // 连接后,parameter.getValue()将获得配置的值//After connecting, parameter.getValue() will get you the configured value
  // id/name placeholder/prompt 的默认长度
  WiFiManagerParameter custom_blynk_token("blynk", "链接WIFI后请手动重启一次", blynk_token, 34);

  //WiFiManager
  //本地初始化。一旦业务完成,就没有必要保留它
  WiFiManager wifiManager;

  //设置配置保存通知回调
  wifiManager.setSaveConfigCallback(saveConfigCallback);

  //在这里添加所有参数
  wifiManager.addParameter(&custom_blynk_token);

  //重置设置 - 用于测试
  //wifiManager.resetSettings();

  //设置重置按钮的功能
  if (SetPinState == HIGH)
  {
    Serial.println("Getting Reset ESP Wifi-Setting.......");
    display.setFont(ArialMT_Plain_10);
    display.clear();
    display.drawXbm(35, 0, WiFi_Logo_width, WiFi_Logo_height, WiFi_Logo_bits);
    display.drawString(0, 40, "RESET mode activated .");
    display.drawString(0, 50, "Please wait for reboot !");
    display.display();
    wifiManager.resetSettings();
    delay(5000);
    Serial.println("Formatting FS......");
    SPIFFS.format();
    delay(5000);
    Serial.println("Done Reboot In 5 seconds");
    display.setFont(ArialMT_Plain_16);
    display.clear();
    display.drawString(5, 25, "Reboot in 5 Sec !");
    display.display();
    delay(1000);

    display.clear();
    display.drawString(5, 25, "Reboot in 4 Sec !");
    display.display();
    delay(1000);

    display.clear();
    display.drawString(5, 25, "Reboot in 3 Sec !");
    display.display();
    delay(1000);

    display.clear();
    display.drawString(5, 25, "Reboot in 2 Sec !");
    display.display();
    delay(1000);

    display.clear();
    display.drawString(5, 25, "Reboot in 1 Sec !");
    display.display();
    delay(1000);

    ESP.restart();
  }

  //获取ssid并传递并尝试连接
  //如果它没有连接,它将启动具有指定名称的访问点,"AutoConnectAP",并进入等待配置的阻塞循环
  if (!wifiManager.autoConnect("OLED时钟", "")) {
    Serial.println("failed to connect and hit timeout");
    delay(3000);
    //重置并重试,或者让它深入睡眠
    ESP.reset();
    delay(5000);
  }

  //如果已经连接
  Serial.println("connected...yeey :)");
  //读取更新的参数
  strcpy(blynk_token, custom_blynk_token.getValue());
  //j将自定义参数保存到FS
  if (shouldSaveConfig) {
    Serial.println("saving config");
    DynamicJsonBuffer jsonBuffer;
    JsonObject& json = jsonBuffer.createObject();
    json["blynk_token"] = blynk_token;
    File configFile = SPIFFS.open("/config.json", "w");
    if (!configFile) {
      Serial.println("failed to open config file for writing");
    }
    json.printTo(Serial);
    json.printTo(configFile);
    configFile.close();
    //end save
  }
  Serial.println("local ip");
  Serial.println(WiFi.localIP());

  ArduinoOTA.setHostname("OLED时钟");
  ArduinoOTA.onStart([]() {
    String type;
    if (ArduinoOTA.getCommand() == U_FLASH) {
      type = "sketch";
    } else { // U_SPIFFS
      type = "filesystem";
    }
    // NOTE: if updating SPIFFS this would be the place to unmount SPIFFS using SPIFFS.end()
    Serial.println("Start updating " + type);
  });
  ArduinoOTA.onEnd([]() {
    Serial.println("\nEnd");
  });
  ArduinoOTA.onProgress([](unsigned int progress, unsigned int total) {
    Serial.printf("Progress: %u%%\r", (progress / (total / 100)));
  });
  ArduinoOTA.onError([](ota_error_t error) {
    Serial.printf("Error[%u]: ", error);
    if (error == OTA_AUTH_ERROR) {
      Serial.println("Auth Failed");
    } else if (error == OTA_BEGIN_ERROR) {
      Serial.println("Begin Failed");
    } else if (error == OTA_CONNECT_ERROR) {
      Serial.println("Connect Failed");
    } else if (error == OTA_RECEIVE_ERROR) {
      Serial.println("Receive Failed");
    } else if (error == OTA_END_ERROR) {
      Serial.println("End Failed");
    }
  });
  ArduinoOTA.begin();
  drawImageDemo();
}

void loop()
{
  time_t now = time(nullptr);

  struct tm* p_tm = localtime(&now);

  display.clear();
  display.setFont(ArialMT_Plain_24);

  if ( p_tm->tm_hour < 10) {
    display.drawString(15, 0, "0" + String(p_tm->tm_hour) + ":");
  } else {
    display.drawString(15, 0, String(p_tm->tm_hour) + ":");
  }

  if ( p_tm->tm_min < 10) {
    display.drawString(47, 0, "0" + String(p_tm->tm_min) + ":");
  } else {
    display.drawString(47, 0, String(p_tm->tm_min) + ":");
  }

  if ( p_tm->tm_sec < 10) {
    display.drawString(81, 0, "0" + String(p_tm->tm_sec));
  } else {
    display.drawString(81, 0, String(p_tm->tm_sec));
  }

  if (p_tm->tm_mday < 10) {
    display.drawString(0, 35, String(p_tm->tm_year + 1900) + "-" + "0" + String(p_tm->tm_mon + 1) + "-" + "0" + String(p_tm->tm_mday));
  } else {
    display.drawString(0, 35, String(p_tm->tm_year + 1900) + " -" + String(p_tm->tm_mon + 1) + " -" + String(p_tm->tm_mday));
  }
  display.display();

  ArduinoOTA.handle();

  int b1 = digitalRead(SetPin);

  if (b1 != SetPinState) {     // 如果和之前的开关值不同...
    delay(20);               // 等待 20 毫秒
    int b2 = digitalRead(SetPin);   // 再读取一次开关值

    if (b1 == b2) {    // 确认两次开关值是否一致
      SetPinState = b1; // 储存开关的状态
      click ++;       // 增加信号变化次数
    }
  }

  if (click == 2) {    // 如果开关状态改变两次
    click = 0;         // 状态次数归零
    toggle = !toggle;            // 取相反值
    Serial.println(toggle);
  }
  if (toggle == 0) {
    display.displayOn();
  } else {
    display.displayOff();
  }
}

void drawImageDemo() {//用于开机时候显示LOGO和网络信息的函数
  display.setFont(ArialMT_Plain_10);
  display.clear();
  display.drawXbm(35, 0, WiFi_Logo_width, WiFi_Logo_height, WiFi_Logo_bits);
  display.drawString(0, 40, "IP: " + String(WiFi.localIP().toString()));
  display.drawString(0, 50, "SSID: " + String(WiFi.SSID()));
  display.display();
  delay(5000);
  display.setFont(ArialMT_Plain_10);
  display.clear();
  display.drawString(0, 0, "Hostname: " + String(WiFi.hostname()));
  display.drawString(0, 10, "RSSI: " + String(WiFi.RSSI()) + " dB");
  display.drawString(0, 20, "MAC: " + String(WiFi.macAddress()));
  display.drawString(0, 35, "Done ! WiFi Connected .");
  display.display();
  delay(5000);
}
转成C组的图片
新建一个名为images.h的文件.
#define WiFi_Logo_width 60
#define WiFi_Logo_height 36
const uint8_t WiFi_Logo_bits[] PROGMEM = {
  0x00, 0x00, 0x00, 0x00, 0x00, 0x00, 0x00, 0x00, 0x00, 0x00, 0x00, 0xF8,
  0x00, 0x00, 0x00, 0x00, 0x00, 0x00, 0x80, 0xFF, 0x07, 0x00, 0x00, 0x00,
  0x00, 0x00, 0xE0, 0xFF, 0x1F, 0x00, 0x00, 0x00, 0x00, 0x00, 0xF8, 0xFF,
  0x7F, 0x00, 0x00, 0x00, 0x00, 0x00, 0xFC, 0xFF, 0xFF, 0x00, 0x00, 0x00,
  0x00, 0x00, 0xFE, 0xFF, 0xFF, 0x01, 0x00, 0x00, 0x00, 0x00, 0xFF, 0xFF,
  0xFF, 0x03, 0x00, 0x00, 0x00, 0xFC, 0xFF, 0xFF, 0xFF, 0xFF, 0x00, 0x00,
  0x00, 0xFF, 0xFF, 0xFF, 0x07, 0xC0, 0x83, 0x01, 0x80, 0xFF, 0xFF, 0xFF,
  0x01, 0x00, 0x07, 0x00, 0xC0, 0xFF, 0xFF, 0xFF, 0x00, 0x00, 0x0C, 0x00,
  0xC0, 0xFF, 0xFF, 0x7C, 0x00, 0x60, 0x0C, 0x00, 0xC0, 0x31, 0x46, 0x7C,
  0xFC, 0x77, 0x08, 0x00, 0xE0, 0x23, 0xC6, 0x3C, 0xFC, 0x67, 0x18, 0x00,
  0xE0, 0x23, 0xE4, 0x3F, 0x1C, 0x00, 0x18, 0x00, 0xE0, 0x23, 0x60, 0x3C,
  0x1C, 0x70, 0x18, 0x00, 0xE0, 0x03, 0x60, 0x3C, 0x1C, 0x70, 0x18, 0x00,
  0xE0, 0x07, 0x60, 0x3C, 0xFC, 0x73, 0x18, 0x00, 0xE0, 0x87, 0x70, 0x3C,
  0xFC, 0x73, 0x18, 0x00, 0xE0, 0x87, 0x70, 0x3C, 0x1C, 0x70, 0x18, 0x00,
  0xE0, 0x87, 0x70, 0x3C, 0x1C, 0x70, 0x18, 0x00, 0xE0, 0x8F, 0x71, 0x3C,
  0x1C, 0x70, 0x18, 0x00, 0xC0, 0xFF, 0xFF, 0x3F, 0x00, 0x00, 0x08, 0x00,
  0xC0, 0xFF, 0xFF, 0x1F, 0x00, 0x00, 0x0C, 0x00, 0x80, 0xFF, 0xFF, 0x1F,
  0x00, 0x00, 0x06, 0x00, 0x80, 0xFF, 0xFF, 0x0F, 0x00, 0x00, 0x07, 0x00,
  0x00, 0xFE, 0xFF, 0xFF, 0xFF, 0xFF, 0x01, 0x00, 0x00, 0xF8, 0xFF, 0xFF,
  0xFF, 0x7F, 0x00, 0x00, 0x00, 0x00, 0xFE, 0xFF, 0xFF, 0x01, 0x00, 0x00,
  0x00, 0x00, 0xFC, 0xFF, 0xFF, 0x00, 0x00, 0x00, 0x00, 0x00, 0xF8, 0xFF,
  0x7F, 0x00, 0x00, 0x00, 0x00, 0x00, 0xE0, 0xFF, 0x1F, 0x00, 0x00, 0x00,
  0x00, 0x00, 0x80, 0xFF, 0x07, 0x00, 0x00, 0x00, 0x00, 0x00, 0x00, 0xFC,
  0x00, 0x00, 0x00, 0x00, 0x00, 0x00, 0x00, 0x00, 0x00, 0x00, 0x00, 0x00,
};


